How to Enable Zoom Translated Captions in Any Meeting
 Equalang
In brief
Turn on Zoom Translated Captions as a host, or get live bilingual captions in your browser when the meeting organizer has not enabled the add-on.
Keywords: zoom translated captions; zoom translated captions add-on; zoom translated captions languages; zoom translated captions add on cost; live bilingual captions for zoom
To use Zoom Translated Captions, the meeting host must hold an eligible Zoom plan or the Translated Captions add-on and enable the feature in the Zoom web portal under Settings > Meeting > In Meeting (Advanced) > Translated captions before the session starts. Once the host turns it on, participants can click Captions (CC) in the meeting toolbar and choose their preferred translation language. If you are attending a meeting or webinar hosted by someone who has not purchased or enabled this add-on, Zoom will only show standard single-language automated captions—or no captions at all—and you will need a browser-based live listening tool on your own device to read bilingual captions.
Why the Translated Captions Option Is Missing in Your Zoom Toolbar
One of the most common frustrations with Zoom's captioning system is that translation availability is tied to the meeting host's account, not yours. Even if you pay for a Zoom license with the Translated Captions add-on on your own account, you only get native translated captions automatically in meetings that you host.
When you join an external client call, an international university lecture, or a vendor webinar, what you see in the bottom toolbar depends entirely on two conditions on the organizer's side:
- Account licensing: The host's organization must have a Zoom tier that includes Translated Captions or must assign a paid Translated Captions add-on license to the host's user profile on Zoom.
- Web portal toggle: The host (or their account administrator) must turn on
Translated captionsin their account settings before the call. If that toggle is off, theTranslate todropdown never appears in the in-meeting caption menu.
If either piece is missing on the host's end, clicking Show Captions will only transcribe the speaker's words in the spoken language.
How to Enable Zoom Translated Captions (If You Are the Host)
If you organize the meeting and your account includes the required license or add-on, you have to enable the feature in the Zoom web portal first. You cannot flip the master switch from inside a live meeting window if it is disabled in your portal settings.
- Open the Zoom web portal: Sign in to your account in a browser and select Settings in the left navigation menu.
- Locate the advanced meeting controls: Click the Meeting tab, then jump to the In Meeting (Advanced) section.
- Turn on Translated captions: Toggle Translated captions on. Notice that enabling translated captions also requires standard Automated captions (just above it) to be active.
- Configure your language pairs: Follow the instructions in Zoom's official guide (Enabling and configuring translated captions) to select which spoken and translated languages are permitted for your meetings, then save your changes.
How Participants Turn On Translated Captions During the Call
Once the host's room supports translated captions, anyone in the call can adjust their own caption view without affecting other attendees:
- Locate the Captions (
CC) button on the bottom meeting toolbar (if your window is narrow, click More first). - Click the small upward arrow (
^) next to Captions. - Check the Speaking language to make sure it matches the language currently being spoken in the room, then set Translate to to the language you want to read.
- Click Show Captions to display the live translated line at the bottom of your video window, or open View Full Transcript in the side panel.
Keep a practical detail in mind during multilingual discussions: if the room switches from English to Japanese or Spanish mid-meeting, participants or the host need to update the Speaking language setting so the speech recognition engine knows which language it is listening to.
How to Get Live Bilingual Captions When the Host Does Not Have the Add-On
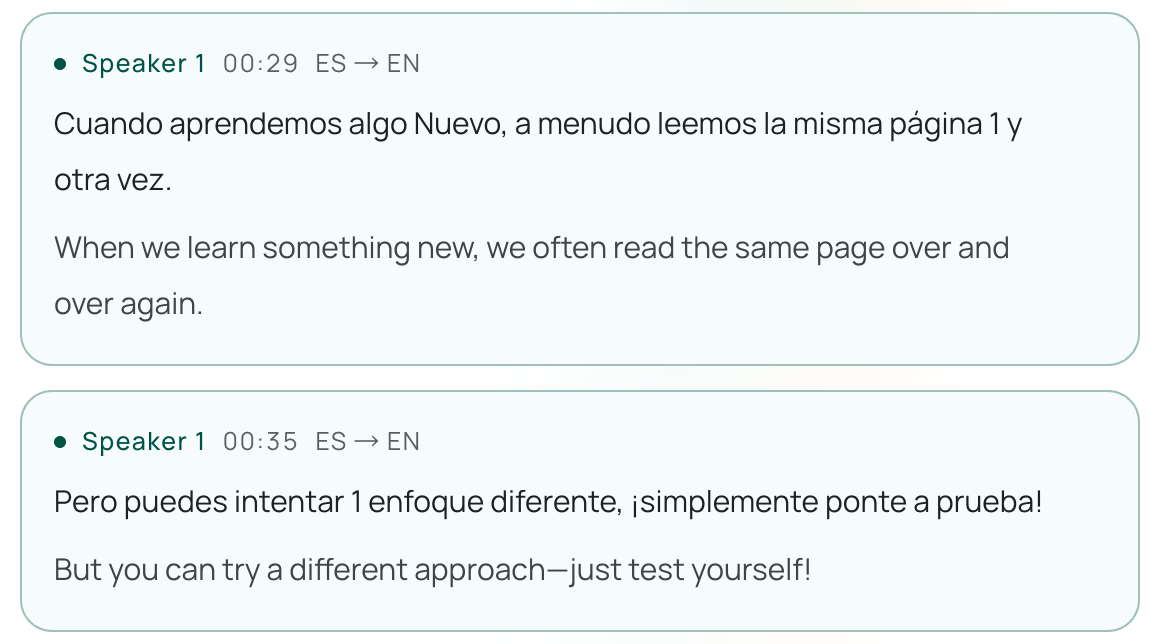
When you join someone else's Zoom call and discover that Translate to is missing, you usually cannot ask an external organizer to buy an add-on license and restart the meeting. Instead of guessing through fast foreign speech, you can open Equalang Live Listening in a browser tab alongside your Zoom window.
Because Live Listening runs directly in your browser on a laptop, tablet, or phone, it requires no software installation and no permissions from the Zoom host.
Step-by-Step Setup Alongside a Zoom Meeting
- Open Live Listening in your browser: Go to Live Listening on your computer, tablet, or phone. New accounts receive 200 credits on sign-up, so you can test the workflow with your audio setup before purchasing credits.
- Set the language direction and latency mode: Select your reading language under I read / I hear and the speaker's language under They speak. Choose between Standard mode and Low latency mode (which responds faster at a higher credit rate).
- Choose a bilingual layout: Pick Side-by-side · Skim if you want your target language in large text with the original speech in smaller text for quick comprehension, or Side-by-side · Study if you want the original foreign speech emphasized so you can check technical terms directly.
- Pause during breaks and export afterward: You can pause and resume listening at any point during the meeting. When the session ends, you can export the bilingual transcript containing both the original speech and the translation. For more tips on following long sessions, see our guide on using live bilingual captions for foreign lectures.
After ending a session, you can also generate an optional AI summary directly from the saved transcript. Selecting the Meeting · Business preset lists action items with owners and deadlines, and every bullet includes a View original link that jumps straight back to that exact moment in the transcript so you can verify important details against the source text.
Practical Boundaries and Audio Routing Tips
To get reliable captions during a live call, keep these real-world constraints in mind:
- Audio pickup depends on your device setup: If you wear headphones connected to your laptop, your computer's microphone will only hear your own voice unless you route system audio internally or place a phone or tablet running
/listennext to an open speaker in a private room. Test your audio source for a few seconds before a critical meeting starts. - Not zero latency or a human interpreter: Automated speech recognition and translation need a moment to hear enough context to form a complete clause. You will see a short delay behind live speech, and overlapping voices, heavy background noise, or unclear microphones can introduce recognition errors. Always verify critical numbers or contract terms against the original transcript.
- Usage-based billing and retention: On the Pricing page, standard Live Listening captions are billed at 35 credits per minute of speech audio actually sent for recognition (turning on optional translated voice read-aloud adds 150 credits per minute of output audio). Silence and muted intervals are not sent and not billed, though continuous speech is split into slightly overlapping segments for complete recognition and those overlaps are included. Bilingual transcripts stay in your History until you delete them (while optional audio recordings are kept for 6 months), and can be exported or deleted anytime.
Turning Recorded Zoom .mp4 or .m4a Files into Bilingual Subtitles
If the meeting is already over—or if you received a cloud or local recording from a colleague—you do not need to play the entire video back in real time. Zoom saves local video recordings as .mp4 and audio-only tracks as .m4a.
You can upload .mp4 or .m4a recordings up to 180 minutes long directly to Equalang Document Translation. The job processes the speech track (silence and background music are not billed) and lets you download time-coded .srt or .vtt subtitle files—with the option to include bilingual lines showing the original speech above the translation—or a clean .txt transcript for meeting notes. Note that this outputs subtitle and transcript files to load alongside your video player rather than burning a new video track or dubbing audio.
Frequently Asked Questions
Can I buy the Zoom Translated Captions add-on just for myself to use in other people's meetings?
Wait before purchasing if you rarely host meetings yourself. In Zoom's system, features like Translated Captions are governed by the host's account and meeting settings. If an external host has not licensed and enabled Translated captions in their own web portal, your personal add-on will not unlock translated captions inside their meeting room.
How many languages do Zoom and Equalang support for translated captions?
Zoom's supported language pairs depend on the host's license tier and which spoken-to-translated combinations the host enables in their web portal (documented in Zoom's KB0052791). For recorded Zoom files or saved transcripts uploaded to Document Translation, Equalang currently covers Chinese, English, Japanese, Korean, Spanish, French and other languages, with automatic source language detection for documents.
How much does it cost to run live bilingual captions in a browser?
Every new Equalang account starts with 200 free credits so you can test your audio setup first. Standard live captions in Live Listening cost 35 credits per minute of speech audio sent for recognition, with silence and muted time excluded. Purchased credits never expire, so you only spend credits during the meetings where you actually need translation instead of paying a recurring monthly add-on fee.